Tuesday, January 31, 2012

Snowman Mug Rug


Before Christmas I ran across an awesome tutorial to make a snowman mug rug,
but the finished product ended up as a 9" square which was a little larger than I wanted.
The snowman mug rug shown above finishes out at 5 1/2" x 7 1/2".
Here is what I did to alter the pattern.
  • 1 - ivory fabric cut  4 1/2" x 4 1/2"
  • 4 - red dot fabric cut 2" x 2" for corners
  • 2 - red dot fabric cut 2" x 5" for the sides of the block
  • 2 - red dot fabric cut 1" x 9" for the top and bottom of the block
  • 1 - backing fabric cut 7 1/2" x 9"


I followed the basic sewing instructions from the original tutorial
but when I got to step 8 this is what I did.


After the carrot nose is applied using an iron-on bonding adhesive,
I laid a strip of tear away embroidery stabilizer  beneath my block before I began
to stitch the nose in place. 


I basically just laid the stabilizer on the back of the block,
then flipped the block 
over to begin outlining the nose.


The embroidery stabilizer has just enough body to 
stabilize the fabric as the carrot is attached.
I used a simple zig-zag stitch set to a very narrow width
for my outline. 


The stabilizer instructions indicated that it can be "torn away" from the fabric,
but I opted to cut it away with a sharp scissors.
If you decide to cut the stabilizer away at this point, 
pay careful attention that you do not cut into the snowman
or it will make him very sad and possibly nose-less!


The snowman face is machine quilted using a simple meandering stitch. 
The rest of the mug rug was straight-line quilted 
using the markings on a walking foot as a stitching guideline.


A few more hours of work and I'll have this stack of snowmen
completed and ready to store away for next Christmas:)

Linking up with:

May you always Sew in Peace!

Monday, January 30, 2012

January UFO Finish


I started this I Spy quilt for my grandson several months ago and was finally 
able to finish up the machine quilting. 
The center is pieced with 77 - 5" I Spy blocks.
The outer border is made by joining 2 1/2" x 5" rectangles.
The outer border also has a 5" block to anchor each corner.
Finished size is approximately 44" x 62".
Here are a few of my favorite blocks.


The back was pieced with 
"Wheels by My Mind's Eye" by Riley Blake Designs 
and features different modes of transportation.
The flannel is ultra soft and snuggly.


Although the quilt does not appear to be square in this photo...it is!
Apparently the photographer will need to  pay closer attention in the future:)


Now that my design wall is empty, 
 it's time to get busy on the next project.


Linking up with:


May you always Sew in Peace!

Friday, January 27, 2012

Sewing Caddy


Seems I'm always making something to give away, but
this week my focus was to complete a sewing caddy for personal use.


The pincushion is made with an enclosed bag of uncooked rice,
and polyester fiberfill. The pincushion includes several
vintage fabrics given to me by my grandmother, and two
antique buttons inherited from my great-grandmother.
This makes me smile.


It features a detachable waste basket.


 Best of all, the pattern was based on a free tutorial designed by 
Elizabeth Hartman for Sew, Mama, Sew.
Wouldn't you enjoy one for yourself?


where you can see other awesome projects that were finished this week.


May you always Sew in Peace!

Wednesday, January 25, 2012

One Flower Wednesday


Happy to report two new additions to my flower garden this week!
If you are working on a hexagon project, 
be sure to stop by Karen's support group and join us
each Wednesday.

May you always Sew in Peace!

Tuesday, January 24, 2012

Texas Tears - Block 4


Civil War quilt along block 4 named "Texas Tears" just about got the best of me.
Perhaps it was the directions. (Certainly couldn't be me...sniff, sniff.)


May you always Sew in Peace!

Wednesday, January 4, 2012

Civil War Block 3


One of my goals for the coming year is to finish up sewing projects that I've already started.  
Today I am focusing on my Civil War quilt project. In case you are not aware, 
Barbara Brackman has a Civil War Quilt-along posted on her blog until July of 2012.  
Each post features a true story shared from the diaries and letters of those who lived during the Civil War, along with the pattern for a new 8" quilt block. Participants can learn about the Civil War and also learn to piece non-traditional quilt blocks from the past.

Block 3 entitled "Seven Sisters" represents the first seven states to form the Confederacy.  The pattern features seven five point stars, but I opted to use a six point star instead. Each star is appliqued to the background fabric.


                                    Not my favorite block to make, but it is finished:)


May you always Sew in Peace!
                                                                                                                                                                                                                                                                                                                                                                                                                                                                                                                                                                                                                                                                                                                                                                                                                                                                                                                                                                                                                                                                                                   

Monday, January 2, 2012

Ringing in the New Year


Every year it seams I face the Christmas season unprepared.
My intentions are good, but there never seems to be enough hours in the day to get it all done.
Can you relate?


To help make Christmas 2012 a stress-free season of joy,
Darlene at Quilting Daze is hosting
The goal is to make or purchase at least one Christmas gift each month
and thus face December with a good portion of your gifts on hand.


So...in the spirit of preparation 
 I was able to pick up a stack of gift bags on clearance at Menard's.
The snowman is my favorite.


I'm planning to use these red bags for Valentine's Day...
because that day usually sneaks up on me as well.


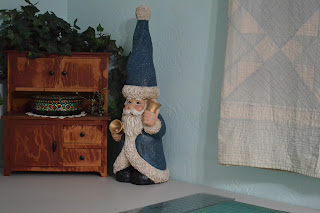
My favorite find of the day is this 2ft. tall Santa gnome.
Isn't he adorable! 
He was on clearance for $12.50 at Menard's and is very well made.
My intentions were to use this for the white elephant Christmas exchange 
my husband's family holds each year...but I'm beginning to reconsider.
He may end up being useful.


Santa gnome may need to stay at my house to provide inspiration for
my "Christmas Through the Year" journey.


Perhaps Santa gnome should sit on my cutting table to cheer me on 
and oversee all my sewing projects.


Or perhaps Santa gnome should sit beside me while I surf the net 
to help make sure my Christmas goals stay on target.


I always thought people who had gnomes were a little weird, 
but that was before I began ringing in the New Year with a plan.


May you always Sew in Peace!